Easy DIY Craft: Frozen-Inspired Princess Wand

This craft is one that the little Elsa or Anna in your life will love– a DIY Frozen-Inspired Princess Wand! This wand is pretty simple to put together. Steps courtesy of hiphomeschoolmoms.com are given below.

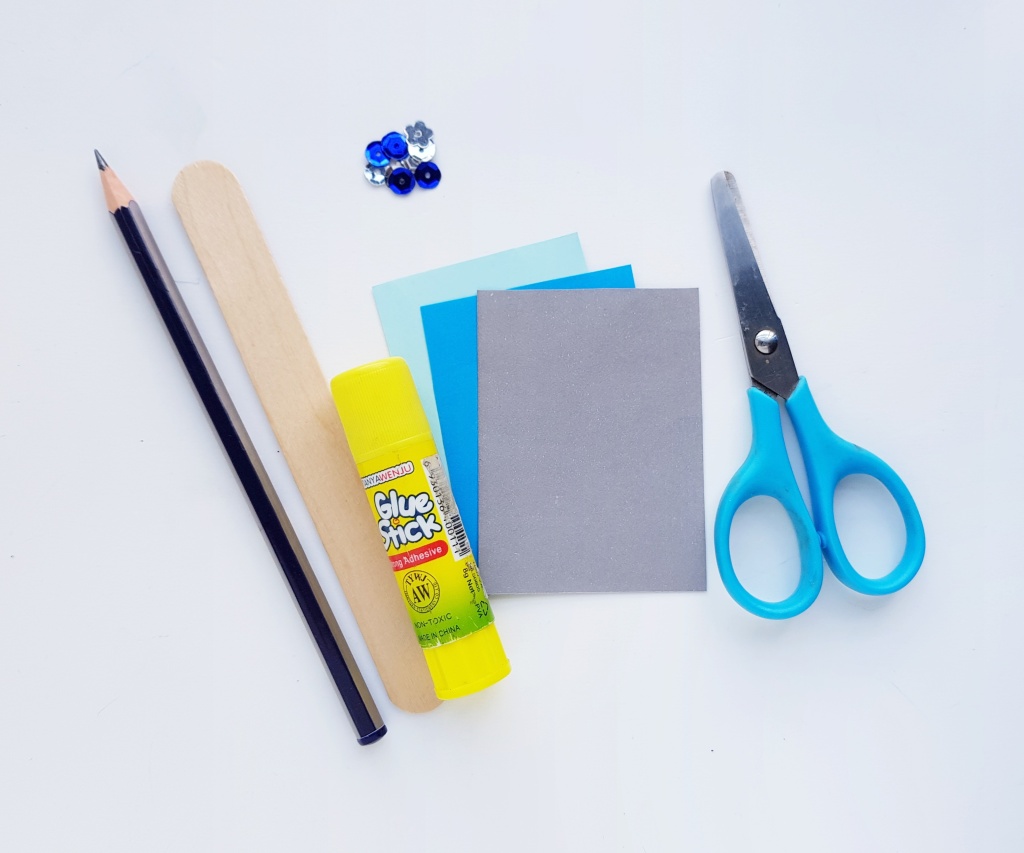
Materials required are: Colored craft paper, Popsicle sticks, Sequins, Pencil, Scissors, and Craft glue.

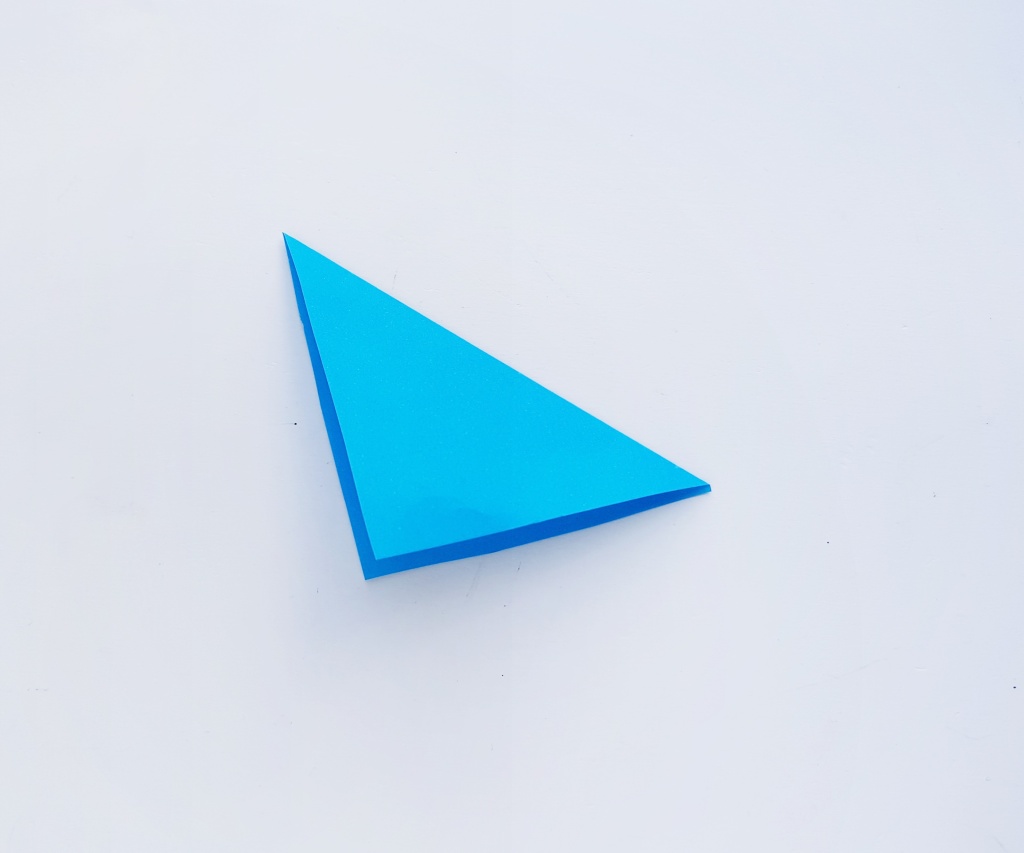
Choose two differently colored pieces of craft paper. For an Elsa-inspired one (like the one shown here) two shades of blue works perfectly! If your little one is more of an Anna fan, you could choose black and purple (the colors of Anna’s dress!). Cut one piece of paper into a 4 x 4 inch square shape. Next, fold it diagonally (into a triangle.)

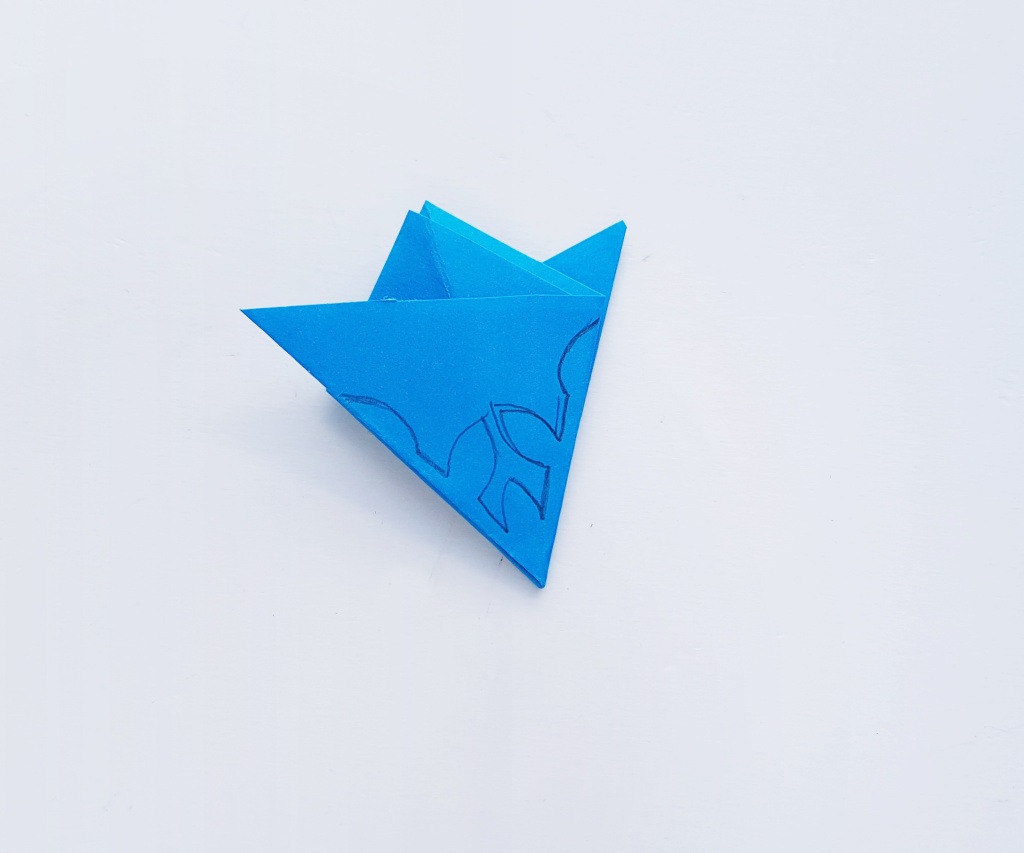
Fold the half folded paper into even thirds. Use a pencil to trace the Magic Wand Template on the folded paper. Once you’ve done this, use scissors and cut along the pattern outline. You want the pattern part to stay intact while you cut away the rest of the paper.

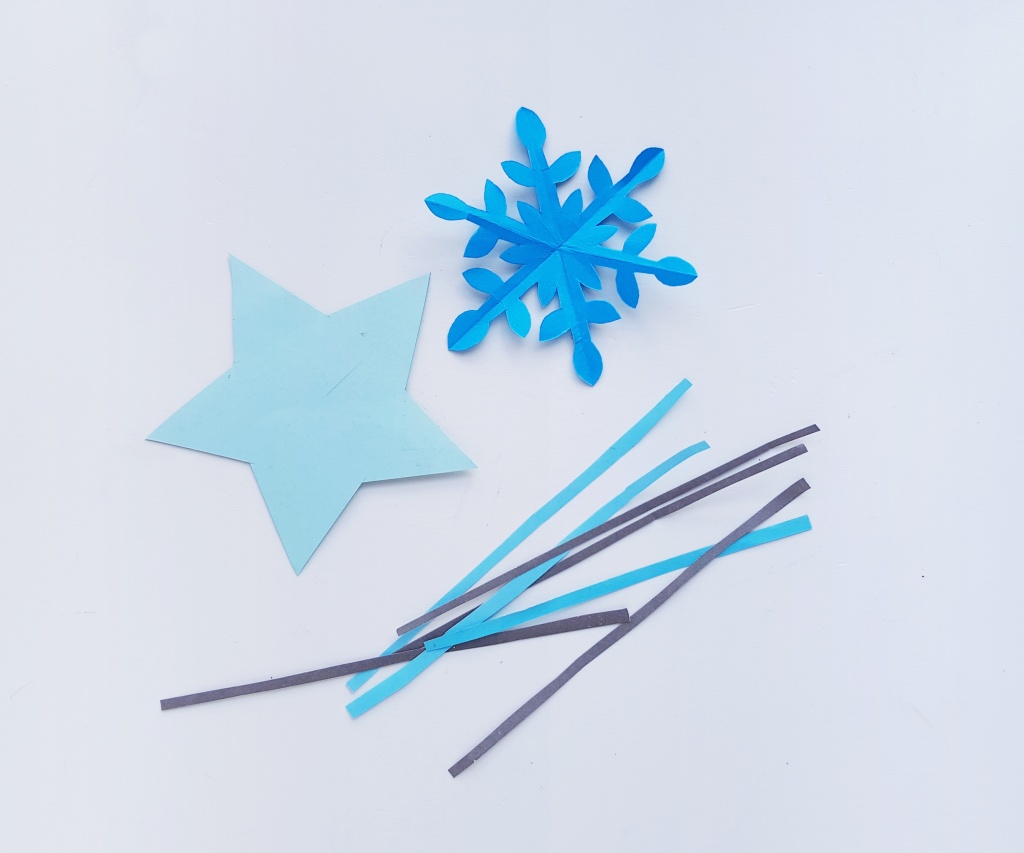
Unfold it to reveal a beautiful snowflake! Now grab the other piece of colored paper and trace the 5 point star pattern on it. Cut out the stars. Next, cut some (6 or more) really thin paper strips from colored craft papers. If you like, you could cut some strands of ribbon instead.

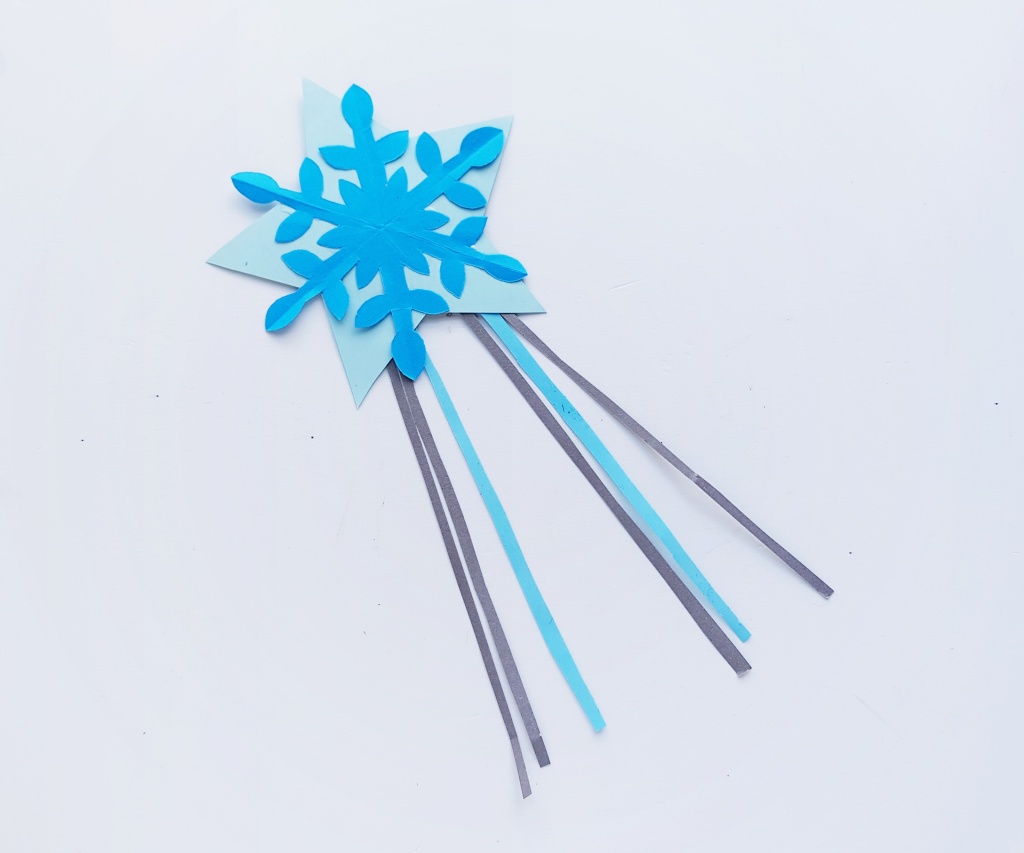
Attach the paper snowflake in the middle of the paper star with a little bit of glue. Attach the paper strips along the bottom the star (on the back.)

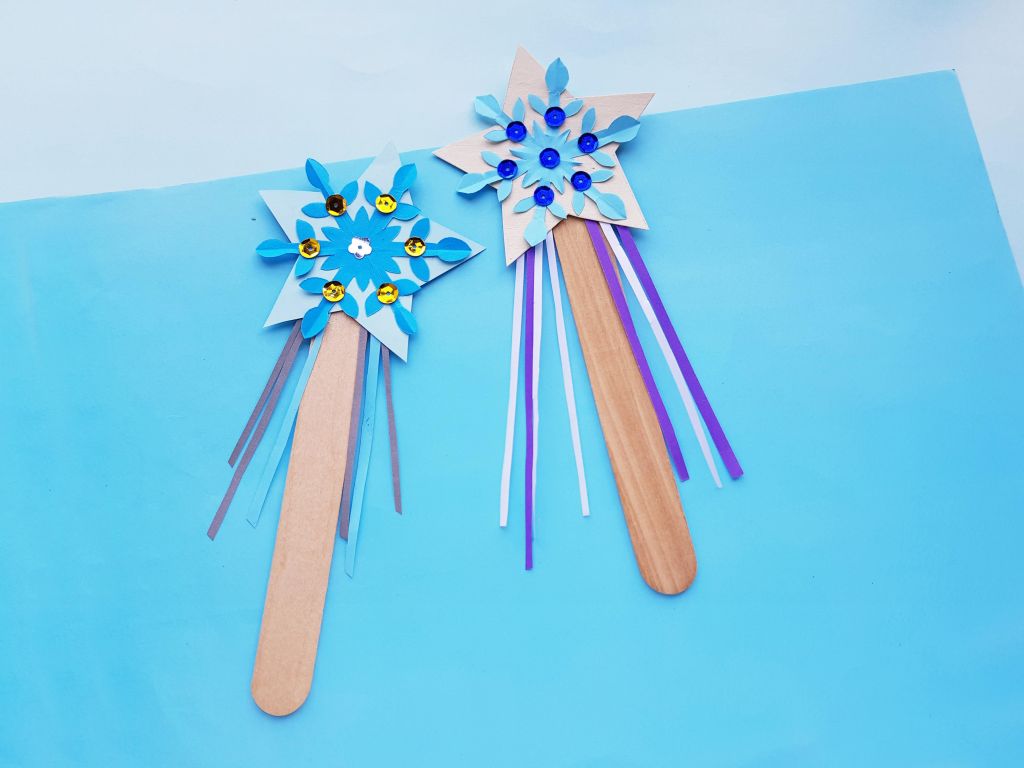
Lastly, use glue to attach the star to the popsicle stick, and have fun adding some decorate sequins to give your wand a little bit of special magic!

Easy DIY craft: Popsicle Stick Boat Craft For Kids

Make a perfect little Popsicle Stick Boat for your kids today. Steps are given below courtesy of inspirationmadesimple.com.

Popsicle Stick Boat Supplies: Large or Small Popsicle Sticks, Hot Glue or Wood Glue, Felt or Foam

On a flat surface, lay 8 popsicle sticks side-by-side. Hot glue together. Lay 4 popsicles on top of the first layer, going in the opposite direction (see photo) and hot glue in place. Hot glue 1 popsicle stick on its side along the edge of the deck. Repeat on the opposite side of the boat. Cut off the ends of 2 popsicle sticks and hot glue on the two empty sides of the boat. The sides are complete.

Cut the corner off a piece of felt or foam to create a sail. Trim the edge off one side of two popsicle sticks to create the mast. Hot glue the felt between the two mast beams. Hot glue the beams to the deck of the boat.

Embellish the boat as desired. You can use a button for the wheel and some Lego pieces. The Popsicle Boat is ready to set sail! And it even floats – in cold water. Do not use hot water, as it can melt the hot glue and your boat will fall apart.

Easy DIY Craft: Popsticle Stick Photo frame

Make an easy picture frame out of craft sticks or popsicle sticks. Find the steps below courtesy of firstpalette.com.

Supplies needed are: Craft sticks or popsicle sticks, Cardboard, White glue or glue gun, Tempera or poster paint, Paint brush, Scissors, Pencil, Ruler, Photo, Magnet or string (Optional), Things to decorate your photo frame with: buttons, sequins, felt, and craft form.

After you have decided on the shape of your frame, paint the craft sticks. You can use a single color for the entire frame or color each craft stick differently for a multi-colored frame.

Once the paint dries, arrange the painted craft sticks into the shape you chose. Glue them together at the ends using white glue or a glue gun.

Decorate your photo frame as you please. You can paint patterns or little designs on it; glue on some sequins, buttons, paper, fabric or felt cut-outs; or draw some designs with puffy paint or glitter glue.

Make a backing board by tracing the outer outline of your craft stick frame onto cardboard.

Draw a slightly smaller square inside the outline. The idea is to make a backing board that is slightly smaller than your craft stick frame. Cut out the cardboard and glue this board at the back of your craft stick frame.

Cut out a photo to a size that fits inside the frame. Glue the photo at the center of the frame.

Easy DIY craft: Popsicle Stick Monsters

This is an easy preschool craft using popsicle sticks. Given below are the steps courtesy of artskills.com.

Materials required are: Popsicle Sticks, Googly Eyes, Crafter’s Closet Acrylic Paint Set, Crafter’s Closet Brushes, Crafter’s Closet Paint Palette, Crafter’s Closet Duct Tape and Crafter’s Closet Tacky Glue.

Glue popsicle sticks together to create a unique base. Let it dry.

Paint the popsicle sticks with various fun and bright colors. 

Double side the duct tapes together and cut into shapes for the mouths, teeth and horns. 

Glue the mouths, googly eyes and horns onto your monster base to create a creepy face and you are done.

Easy DIY craft: Popsicle Stick Dragonfly

This simple dragonfly craft is fun and easy to make with the little ones. Following are the steps courtesy of theinspirationedit.com.

Here are the supplies you will need for this dragonfly activity: Popsicle stick, Pompoms, Googly eyes, Pencil, Scissors, Craft glue, and Glitter paper.

Apply a drop of glue on any one open side of the popsicle stick. Place a large pompom on the glued part of the popsicle stick. Apply another drop of glue near the large pompom and then place a small pompom on it.

Select a glitter craft paper and trace the dragonfly wings on it. Use scissors to cut out the traced wings.

Easy DIY craft: Popsicle Stick Christmas Trees

It will be fun making a sparkling Christmas tree with these colored popsicle sticks! Go on and decorate your tree with the glittery popsicle sticks ornaments as well. Given below are the instructions for making the craft courtesy of onelittleproject.com

Things you need are Coloured popsicle sticks, Foam sticker stars, Sticker rhinestones, Twine, Glue gun, and Utility knife.

We want to cut 5 different sizes of popsicle stick pieces cut to 1″, 1.5″, 2″, 2.5″, and 3″ lengths. To cut the popsicle sticks, use a utility knife and score the popsicle sticks on both the front and back. Make sure you score it on both sides of the popsicle stick or it won’t snap evenly. Then after you’ve done that, it just breaks apart really easily when you bend it. No jagged edges or anything.

Using a scrap piece of popsicle stick, maybe about 1/2″ long, add a generous glob of hot glue and sandwich a small piece of twine between the purple popsicle stick “trunk” and the small scrap. 

Evenly space out all of your popsicle stick pieces on the purple popsicle stick then use a glue gun to attach them to the “trunk”.

Go crazy with those glittery sticker rhinestones and decorate your popsicle stick Christmas tree! Then stick the sparkly foam sticker star. The pretty christmas tree is ready.

All the glittery goodness will make you smile. Have a bit of extra sparkle at this Christmas time!

Easy DIY craft: Popsicle Stick Hexagon Shelf

Have some Popsicle sticks lying around in your home? Well, you can turn them into a beautiful hexagon shelf which can be useful. Given below are the instructions to make the Popsicle stick Shelf courtesy of make&docrew.

The materials used to make the hexagon shelf are Popsicle sticks (about 100), tacky glue, wax stain, paint brush, nails. Draw a hexagon on a plane white paper and place Popsicle sticks above the hexagon to get a perfect shape. Add a drop of glue to both ends of three Popsicle sticks and lay them as shown

Continue gluing and layering like this until your hexagon shelf is a deep as you’d like it to be. Mine is about 16 sticks deep.

Stain your hexagon shelf, taking care to get stain in between all of the Popsicle sticks and just put two nails in the wall that the shelf could hang on.