Wooden crafts always give an aesthetic look to home decor. Make your own ‘Old’ farmhouse gate wall hanging that gives a beautiful look to your room. Below are the steps courtesy of littleredbrickhouse.com
Place the 6 feet boards at a 1.5-inch distance from each other. Place 2 boards across them with the angles board in between. Assemble it with wood glue and nails.
Next, draw an arch on the top of the gate with a pencil.
Using a jigsaw, carefully cut out the arch
Sand the edges round to get rid of any obvious splinters from the fresh cuts.
Apply the stain of your choice to give the gate a smooth appearance.
Wait for the stain to dry up and add a leaf or flower wreath on it and the ‘Old’ Farmhouse Gate is ready to be hanged!
If you are looking for crafts to make your house look shiny, glitterball yarn ornaments are your best choice. Following are the steps to make one courtesy of onelittleproject.com
Cut around 15 to 20 pieces (2.5ft long) of yarn per ball ornament. The more yarn you use, the better your ornament will look. Mix your glue, water, and glitter in the disposal bowl. You can blow a balloon up and slowly let the air escape still you reach the right size. Hang the balloon on a kitchen cupboard or light holder above the dining table.
Now going to the messy and fun part, add one strain of yarn into the bowl of glue and sink it fully into the bowl and stir using the plastic fork. Find the end of the yarn, then run it through the fork as shown in the picture. Forks work so well to remove the excess glue. Carefully wrap the strain of yarn around the balloon and when you reach the end of the yarn, sink the next set of yarn into the bowl.
When you finish wrapping a strand of yarn, make sure you tuck the end under another piece of yarn so that it doesn’t fall down when you let go of it. Keep adding more glue-covered yarn in different directions until you are happy. You can leave the yarn ball hanging overnight to dry. Then make a small cut in the balloon, very close to the knot. When the balloon is deflated, you can pull it out from the yarn ball.
Tie a piece of string around the yarn, and the ball ornament is complete. You can make the glitterball yarn in various colors by using different colors of cotton yarn and matching color glitter.
These crafts are easy to make and inexpensive too. You can hang paper chains as festive party decorations, or you can just make them for fun. Kids will love the bright colors and the hours of fun. Given below are the steps courtesy of diynetwork.com.
Materials Required are colored cardstock, scissors, stapler, ruler.
Cut the cardstock into 16 strips of 1″ x 11″. Set aside two red strips for a larger top heart. Cut the rest of the strips in half (1″ x 5-1/2″).
Staple two strips of the same color together on one end. Form heart shape with the two unstapled ends of the first heart. Before stapling, tuck in two strips of another color for the next heart.
Staple all four strips to form the first heart and to start the second heart.
Continue steps until you have 14 hearts. Add the two long red strips to the top to create the larger red heart and your countdown Paper chain is ready.
Here’s a fun paper plate minion craft! It’s easy, colorful, and requires only basic craft supplies. Steps courtesy of kidsactivitiesblog.com for the craft are given below.
Materials required are: 2 white paper plates, yellow, blue, and black paint, scissors, black construction paper, large wiggly eyes, black permanent marker, 2 black buttons, and glue.
Paint 1 paper plate yellow and the other paper plate blue. Allow the paint to dry completely. When the plates are dry, cut the blue plate in half. Glue it down to the yellow plate. Cut straps for the minion’s overalls from the remaining blue paper plate. Glue them down. Next, cut 2 large black circles and glue the large wiggly eyes to the center.
Glue 2 large black buttons to the bottom of the overall straps. Use the black marker to draw a pocket on the minion’s overalls.
Glue the minion’s eyes to the paper plate. Use the black marker to draw a smile and straps for the minion’s goggles. Use the scissors to cut the top of the paper plate to make the minion have hair. Cute minion is ready! Perfect for birthday parties, minion parties, or just a crafty afternoon at home.
This is such a simple craft that you can make with the kids and the best part is that you probably have everything you need at home already. This craft is really simple, super-fast, and completely adorable when you’re done. Below are the steps courtesy of onelittleproject.com.
Materials required are Construction paper, Pink Marker, Black gel pen, or a Pencil, Scissors.
Start by tracing a handprint, but you have to make the handprint a little fatter than you normally would. Cut out the handprint. Make sure you have a V at the bottom between each finger.
Cut a small slit beside the baby finger. You want the bottom of the cut to line up with the bottom of the space beside the thumb. Once you cut the slit, the baby finger will look a bit crooked. So feel free to trim that baby finger a little to fix the shape.
Next, you can fold down the baby finger towards the center to make one of the bunny arms. Then fold down the thumb towards the center for the other bunny arm. I like to fold them so the two hands “touch” in the middle.
Cut off the middle finger so you’re left with two-finger “bunny ears”. Use a pink marker to draw the pink parts of the ears. Then draw an oval for the rabbit’s nose. Using a black gel pen, draw the rest of the face – eyes, whiskers, and mouth. Finally, draw two little paws at the bottom of the hand print to make the bunny’s feet. Your paper bunny is complete!
These crafts are easy to make and inexpensive too. Kids will love the bright colors and the hours of fun. Use these paper flowers to add color and style to gifts, clothes and so much more! Given below are the steps courtesy of diynetwork.com.
Materials Required are printable heart paper or scrapbook paper, hot-glue gun, and scissors.
Use scissors to cut off white edges of the paper. Cut out a heart shape about 2-1/2 inches high. Use the first heart shape as a guide, and continue cutting out hearts from the heart patterned paper, changing the orientation of the pattern for variation. You’ll need 10 to 12 hearts per flower.
Cut out a small circle about 1-3/4″ to 2″ in diameter from the heart patterned paper. Fold the point of each heart to create dimension. Add a dollop of hot glue to the cutout circle. Attach the points of 5 hearts (overlapping) to the circle. Add more glue to the center of the flower and continue attaching heart petals until the desired look is achieved.
Create a piece of fringe, by cutting one of the long white paper strips 3/4 of the way, keeping a solid strip to hold it together. Tightly roll the paper strip. Add a dollop of hot glue to the center of the flower, and place rolled white paper fringe strip in the glue. Fluff out fringe to create a full center.
These paper flowers can be used in many ways! Add to a gift box for an adorable embellishment; add a pin to the back for wearing, or add a dowel or straw to create an upright flower.
These crafts are easy to make and inexpensive too. Kids will love the bright colors and the hours of fun, they may not look like regular paper airplanes, but they are guaranteed to fly every time. Assemble several in different colors and let the flying competitions begin. Given below are the steps courtesy of diynetwork.com.
Materials required are paper straws, scissors/paper cutter, cardstock, and clear tape.
Start by cutting 5″ x 1″ strips of card stock. Each airplane will need three strips. Once the strips are cut, tape two of the strips together at the ends. You now have one 5-inch strip and one strip that is approximately 10 inches long.
Tape the ends of each strip together to create a circle. Repeat this step on the other strip.
Once both circles are made, use a piece of tape to secure the end of the straw inside the large circle. Repeat the step with the small circle, securing it to the opposite end of the straw.
In a matter of minutes, the airplanes are ready for flight.
This beautiful Photo card is deceptively simple to make and is perfect for Anniversary gifts. The following are steps courtesy of diyinspired.com
Materials needed are Pictures, Black Card Stock, Pencil, Ruler, Hole Punch, Ribbon, Scissors, Double Sided Tape, and Ring Box.
Determine the width of your paper by measuring your ring box. Mark every two inches and fold to make squares. That will fit five 1.7” photos on each side.
Punch two holes and tie a bow with some ribbon in remaining left over inch. Tape your photos on each side of the accordion using double sided tape.
Fold them up and place it inside your ring box so that when box opened photo can be taken out as chain.
You can even change it up a bit and put text in some of the squares to turn it into a beautiful party invitation. Enjoy making photo cards.
This is a great candy corn craft for kids, simple to make and you probably already have all of these supplies around your house. Given below are the steps courtesy of aboutamom.com.
Materials needed are Craft sticks, Orange-yellow and white card stock, Orange-yellow-white acrylic craft paint, glue,and Scissors.
Lay out a piece of scrap newspaper and Glue three craft sticks together to make a triangle shape and let dry.
Determine which will be the top point and paint the top 1/3 of the triangle white. Paint the center 1/3 orange and the bottom 1/3 yellow and let dry.
Trace the outside of the triangle onto a piece of orange, yellow and white cardstock and cut out with scissors. Glue cardstock according to colours of sticks.
Glue the paper candy corn to the back of the craft stick candy corn. Your candy corn craft is ready.
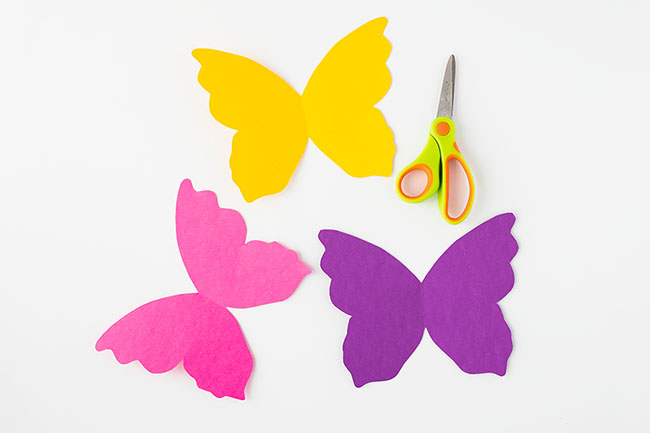
This adorable toilet paper roll butterfly craft is so fun and easy to make! Play with your kids and enjoy each moment. Below are the steps courtesy of thebestideasforkids.com.
Supplies needed are toilet paper roll, small googly eyes, colored buttons, cardstock, acrylic paint, pipe cleaner, small pom poms, black sharpie, and butterfly wing template. First Paint the paper roll a color of your choice and let it dry. You may need to paint a few coats for lighter colors.
For the wings, fold a piece of cardstock in half. Trace the template or draw your own wings.
Cut out the wings.
Glue colored buttons to the butterfly wings. Or have fun decorating the wings however you’d like! You can use pom poms, craft gems or even just color on your own designs. To make the antennae, bend the pipe cleaner into the shape of a “V”. Curl the tips of the “V” down. Glue two small pom-poms to the tips.
Glue the antennae to the inside top of the paper roll. Glue the googly eyes near the top of the paper roll and draw a mouth with the black marker. Finally, glue the wings to the back of the paper roll. Your butterfly is ready!