Easy DIY Crafts: Countdown Paper Chains

These crafts are easy to make and inexpensive too. You can hang paper chains as festive party decorations, or you can just make them for fun. Kids will love the bright colors and the hours of fun. Given below are the steps courtesy of diynetwork.com.

Materials Required are colored cardstock, scissors, stapler, ruler.

Cut the cardstock into 16 strips of 1″ x 11″. Set aside two red strips for a larger top heart. Cut the rest of the strips in half (1″ x 5-1/2″).

Staple two strips of the same color together on one end. Form heart shape with the two unstapled ends of the first heart. Before stapling, tuck in two strips of another color for the next heart.

Staple all four strips to form the first heart and to start the second heart.

Continue steps until you have 14 hearts. Add the two long red strips to the top to create the larger red heart and your countdown Paper chain is ready.

Easy DIY Crafts: Fire Breathing Dragon

This fire breathing dragon made from a toilet paper roll is an easy kids craft that uses simple craft supplies. It is easy to make and fun to play with. When you blow into the end of the tube the tissue paper looks like flames coming out of the dragon’s mouth. Below are the steps courtesy of onelittleproject.com.

Materials required are Scissors, Glue Stick, Glue Gun, Paper roll, Construction Paper, 2 Medium Pom Poms, 2 Small Pom Poms, 2 Medium Googly Eyes, Red, Yellow, and Orange Tissue Paper.

Cut a piece of construction paper to be the exact length of your paper roll. Spread glue from a glue stick onto one side of the paper. Line up the ends of the paper with the ends of the paper roll, then wrap the paper around the roll so it’s completely covered.

Using a glue gun or glue dots, attach one of the googly eyes to the middle of one of the larger pom poms. Repeat for the second googly eye and second larger pom poms. Using a glue gun or glue dots, attach each of the dragon eyes to one end of the paper roll and the two smaller pom poms near the other end of the paper tube to make the dragon’s nose.

For the fire, cut scraps of red, yellow, and orange tissue paper to belong pointy strips, about 9″ or 10″ long. Spread some glue from a glue stick onto the straight end of one of the strips of tissue paper, then attach it to the inside of the paper roll under the dragon’s nose. 

Repeat and keep gluing tissue paper to the inside of the paper roll as you work your way around the roll. Your paper roll dragon is complete! Take a deep breath, put your mouth on the end of the paper roll and BLOW!

Easy DIY Crafts: Paper Handprint Bunny

This is such a simple craft that you can make with the kids and the best part is that you probably have everything you need at home already. This craft is really simple, super-fast, and completely adorable when you’re done. Below are the steps courtesy of onelittleproject.com.

Materials required are Construction paper, Pink Marker, Black gel pen, or a Pencil, Scissors.

Start by tracing a handprint, but you have to make the handprint a little fatter than you normally would. Cut out the handprint. Make sure you have a V at the bottom between each finger.

Cut a small slit beside the baby finger. You want the bottom of the cut to line up with the bottom of the space beside the thumb. Once you cut the slit, the baby finger will look a bit crooked. So feel free to trim that baby finger a little to fix the shape.

Next, you can fold down the baby finger towards the center to make one of the bunny arms. Then fold down the thumb towards the center for the other bunny arm. I like to fold them so the two hands “touch” in the middle.

Cut off the middle finger so you’re left with two-finger “bunny ears”. Use a pink marker to draw the pink parts of the ears. Then draw an oval for the rabbit’s nose. Using a black gel pen, draw the rest of the face – eyes, whiskers, and mouth. Finally, draw two little paws at the bottom of the hand print to make the bunny’s feet. Your paper bunny is complete!

Easy DIY crafts: Easy Paper Lily

These handprint lilies are so beautiful and surprisingly easy to make! They’d make such a thoughtful handmade gift idea if you make a small bouquet and tie them together with a ribbon. Either way, they’re adorable for spring and they’re a wonderful low mess craft to make with the kids. Below are the steps courtesy of onelittleproject.com.

The materials required are pink paper, 6 green, and yellow pipe cleaners, pencil, tape, and scissors.

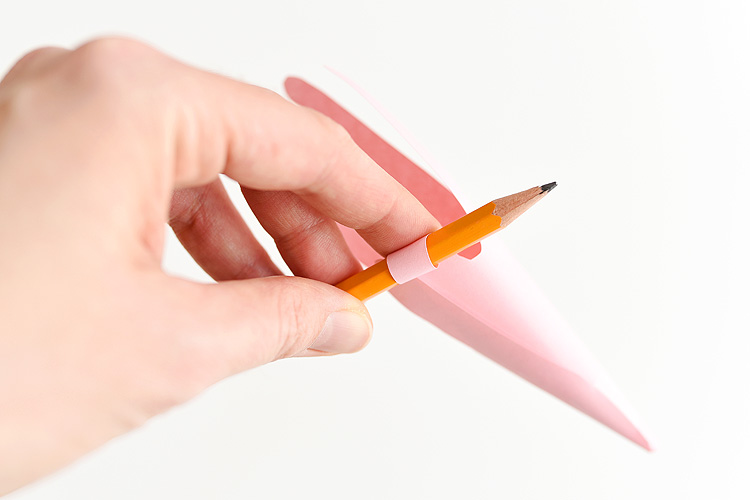
Start by tracing the outline of your hand onto the printer paper. Then cut out your handprint. If you have any pencil marks showing on the paper, just use an eraser to carefully erase them. Curl the bottom of the handshape into a cone. Leave a small hole at the tip of the cone, just large enough to fit a pipe cleaner through.

Then use a small piece of invisible tape to hold it together. Use a round pencil to curl each one of the fingers of the handprint outwards. Curl each one of the fingers outwards so that your flower looks something like this:

If you don’t have short pipe cleaners, just cut the standard 12″ long pipe cleaners in half. Start by bending the yellow pipe cleaner in half:

Pinch the “J” shape in the green pipe cleaner so it tightly holds the yellow pipe cleaner. If there’s room, you can twist it a little, but as long as you pinch it tightly, it should hold itself together nicely. Then take the longer end of the yellow pipe cleaner and wrap it tightly around the shorter side of the yellow pipe cleaner. Keep wrapping tightly until you reach the end of the yellow pipe cleaner.

Take the pipe cleaner stem and poke it through the middle of the handprint flower, pulling it all the way through so the green stem is below the flower and the yellow part is in the middle of the flower. Then repeat all of these steps to make yourself a small bouquet!

Easy DIY Crafts: Cupcake Liner Flowers

This crafts are easy to make and inexpensive too. It is a great party decor and is a fun rainy-day craft to keep the kids busy. Given below are the steps courtesy of diynetwork.com.

Materials required are: To make one flower you will need eight cupcake liners, a glue gun, a glue stick, a button or jewel, and a pipe cleaner or sticks.

Each flower will use eight cupcake liners of any size and any color. You could even mix up the colors for a really unique flower. Fold each of the liners in half. Finally, fold one of the halves back and then fold the other half back so it looks like a zigzag.

Take two liners and using a glue stick, glue the two points together. Hold tightly together for about 30 seconds, then set aside. Repeat this step until all of the liners are glued into pairs. Glue two sets together at the points and hold for about 30 seconds, and repeat on the other side.

Make sure all the pieces create a full circle. Let it sit for a few minutes while the glue dries completely. Turn the flower over and glue a button, jewel, or small pom to the center of the flower.

Use a glue gun to secure a pipe cleaner or a stick to the back of the flower. Repeat the entire process to create a bouquet.

Easy DIY Crafts: Decorative Paper Flowers

These crafts are easy to make and inexpensive too. Kids will love the bright colors and the hours of fun. Use these paper flowers to add color and style to gifts, clothes and so much more! Given below are the steps courtesy of diynetwork.com.

Materials Required are printable heart paper or scrapbook paper, hot-glue gun, and scissors.

Use scissors to cut off white edges of the paper. Cut out a heart shape about 2-1/2 inches high. Use the first heart shape as a guide, and continue cutting out hearts from the heart patterned paper, changing the orientation of the pattern for variation. You’ll need 10 to 12 hearts per flower.

Cut out a small circle about 1-3/4″ to 2″ in diameter from the heart patterned paper. Fold the point of each heart to create dimension. Add a dollop of hot glue to the cutout circle. Attach the points of 5 hearts (overlapping) to the circle. Add more glue to the center of the flower and continue attaching heart petals until the desired look is achieved.

Create a piece of fringe, by cutting one of the long white paper strips 3/4 of the way, keeping a solid strip to hold it together. Tightly roll the paper strip. Add a dollop of hot glue to the center of the flower, and place rolled white paper fringe strip in the glue. Fluff out fringe to create a full center.

These paper flowers can be used in many ways! Add to a gift box for an adorable embellishment; add a pin to the back for wearing, or add a dowel or straw to create an upright flower.

Easy DIY Crafts: Straw And Paper Airplanes

These crafts are easy to make and inexpensive too. Kids will love the bright colors and the hours of fun, they may not look like regular paper airplanes, but they are guaranteed to fly every time. Assemble several in different colors and let the flying competitions begin. Given below are the steps courtesy of diynetwork.com.

Materials required are paper straws, scissors/paper cutter, cardstock, and clear tape.

Start by cutting 5″ x 1″ strips of card stock. Each airplane will need three strips. Once the strips are cut, tape two of the strips together at the ends. You now have one 5-inch strip and one strip that is approximately 10 inches long.

Tape the ends of each strip together to create a circle. Repeat this step on the other strip.

Once both circles are made, use a piece of tape to secure the end of the straw inside the large circle. Repeat the step with the small circle, securing it to the opposite end of the straw.

In a matter of minutes, the airplanes are ready for flight.